Follow Along
I'm assuming you will be following along with QBASIC in front of you. This won't be much fun if you aren't. So power up the computer and get QBASIC's blue screen up in front of you. Go ahead and press the <Esc> key to "clear this dialog box" when it asks you.
QBASIC's Screen

QBasic interface
Current program
The current program is displayed in the middle of the screen, and covers most of the QBasic interface.
Menu
The menu provides most of the operations for the QBasic editor. Such as opening a file, pasting text, and searching for a string.
File

New - Clears the current program
Open - Loads a program from disk
Save - Saves the current program to disk
Save As - Saves the program, but under a different name
Print - Prints the selected text, current window, or entire program
Exit - Closes the QBasic interpreter
Edit

Cut - Removes the selected text and stores it in the clipboard
Copy - Copies the text instead of removing it
Paste - Adds the text in the clipboard to the current position of the cursor
Clear - Removes the text without storing it to the clipboard
New Sub - Enables you to create a new subroutine (see Subroutines and Functions)
New Function - Enables you to create a new function (see Subroutines and Functions)
View

SUBs - Shows the list of current subroutines and functions (see Subroutines and Functions)
Split - Displays the contents of the current program in two windows. If the window is already split, this hides the second window (NOTE: The text in each window is always the same, even if you alter the text in one window)
Output Screen - Shows the QBasic output screen.
Search

Find - Allows you to search for a string of text in the program
Repeat Last Find - Continues the previous search operation
Change - Replaces each instance of a string with another string
Run

Start - Executes the current program
Restart - Starts from the beginning
Continue - Continues execution at the current position
Debug

Step - Processes the next command
Procedure Step - Processes the next command, but does not show QBasic going inside a subroutine or function
Trace On - Shows the command that is being executed while the program is running
Toggle Breakpoint - Sets or removes a breakpoint. Use this to have the QBasic interpreter stop when it reaches a specified line in the program
Clear All Breakpoints - Removes all breakpoints in the program
Set Next Statement - Allows you to continue execution at the specified line
Options

Display - Enables you to change display colors, the number of spaces to use for tabs, and whether or not scroll bars are visible
Help Path - The location of the QBASIC.HLP file
Syntax Checking - Allows you to have the QBasic editor check the syntax of your program as you type
Help

Index - List of all QBasic commands, keywords, operators, etc.
Contents - The table of contents for QBasic help
Topic - Show help for a specific keyword
Using Help - Displays information on using QBasic help
About - Shows information about the QBasic interpreter
Name of current program
The file name of the current program is displayed near the top of the screen in the center. You can change the name by selecting "Save As" on the "File" menu.
Immediately execute a command
QBasic provides a way to execute a command without running the current program. To do so, select the bottom window (under "immediate") and enter a command, then press Enter.
Status bar
The status bar is at the bottom of the screen. It displays a short list commands (<Shift+F1=Help> <F6=Window> <F2=Subs> <F5=Run> <F8=Step>).
When you highlight an item on the menu, the status bar displays a short description of what the item does.
Status of Caps Lock and Num Lock
If Caps Lock is set, a "C" is displayed on the right side of the status bar.
If Num Lock is set, an "N" is displayed on the right side of the status bar.
Current line
On the right side of the status bar, the current line of the cursor is displayed.
Current column
On the right side of the status bar, the current column of the cursor is displayed (immediately after the current line).
Before we start, let's take a look at QBASIC's screen. At the top is QBASIC's menu. The menu has the following items: File, Edit, View, Search, Run, Debug, Options, and Help.
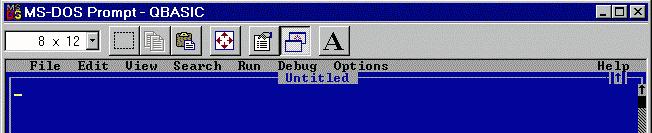
Clicking on any of these with the mouse will show more selections.
Just under the menu is the word "Untitled". This means we haven't given the current program a name. This will change when we learn to save programs. The big blue area with the blinking cursor (
These are the most important areas to know for right now. We will learn more about the rest of QBASIC's screen as we go along.
QBASIC Editor
If you've used your computer to do school work or write a report, you'll notice that most of the editing keys (<Backspace>, <Delete>, <Insert>...) work just the way they always do. In case you haven't used these keys before, here's a list:
- <Backspace> - Removes the character to the left of the cursor
- <Delete> - Removes the character at the cursor
- <Left Arrow> - Moves the cursor left
- <Right Arrow> - Moves the cursor right
- <Up Arrow> - Moves the cursor up
- <Down Arrow> - Moves the cursor down
- <Home> - Moves the cursor to the start of a line
- <End> - Moves the cursor to the end of a line
FULL SCREEN MODE
Whenever we RUN all our programs, we always see the output screen in a small window in our desktop. We can make our program maximize the entire screen of the monitor. Full screen mode is the term used when we change the size of the screen and make it occupy the entire screen. To switch to full screen mode, simply the ALT key plus the ENTER key from the keyboard.
ALT + ENTER
To go back to the original window size, just press the same keys.
SCREEN (Statement)Syntax: SCREEN [mode][,[colorswitch] [,[activepage] [,[visualpage]]]]
Purpose:
To set screen attributes. See Also: WIDTH
The SCREEN statement can involve extensive information, due to the variety of combinations of the available settings. To allow you to find your information faster, the information has been grouped in the following sections:
Screen Modes
  All of the options in the SCREEN statement are numbers. The first option sets the screen mode. The second option is only applicable for use with monochrome monitors (enabling and disabling color), and is obsolete. Activepage and visualpage are explained later on.
The different screen modes allow different types of display. The two types of modes are text modes and graphics modes. The text modes can display text only- displaying graphics on the screen in these modes is impossible. Graphics modes, however, can display both graphics and text. The differences between the modes are mainly resolutions and colors. Below is a list of the capabilities of each screen mode, including the number of video memory pages each has (explained later).
A word on terminology: If a screen mode is capable of "64 colors to 16 attributes", it means that there are 64 possible colors that can be displayed, but only 16 of any combination of those colors can be displayed at once. This is analagous to shopping bags- you have 8 bags, but you only have 2 arms, so you can only carry any two of the bags at a time. (Sorry no loopholes.) For infromation on what attributes can be set to colors, see the COLOR statement.
| Mode |
Capabilities |
SCREEN 0:
Text only |
Text: 40 or 80 columns by 25, 43, or 50 rows
Character sizes 8x14, 9x14, or 9x16
16 colors to 2 attributes
64 colors to 16 attributes (EGA or VGA)
No video memory pages |
SCREEN 1:
Graphics
320x200 |
Text: 40 columns by 25 rows
Character size: 8x8
16 colors to 1 attribute
16 colors to 4 attributes
1 of 2 palettes of 3 foreground colors
No video memory pages |
SCREEN 2:
Graphics
640x200 |
Text: 80 columns by 25 rows
Character size: 8x8
16 colors to 2 attributes
No video memory pages |
SCREEN 7:
Graphics
320x200 |
Text: 40 columns by 25 rows
Character size: 8x8
Video memory page size: 32K
Video page range: 0 to 7
16 colors to 16 attributes
|
SCREEN 8:
Graphics
640x200 |
Text: 80 columns by 25 rows
Character size: 8x8
Video memory page size: 64K
Video page range: 0 to 3
16 colors to 16 attributes
|
SCREEN 9:
Graphics
640x350 |
Text: 80 columns by 25 or 43 rows
Character sizes: 8x14 or 8x8
Video memory page size: 64K
Video page range: 0 to 1
64 colors to 16 attributes
|
SCREEN 11:
Graphics
640x480 |
Text: 80 columns by 30 or 60 rows
Character sizes: 8x16 or 8x8
262,144 colors to 2 attributes
No video memory pages |
SCREEN 12:
Graphics
640x480 |
Text: 80 columns by 30 or 60 rows
Character sizes: 8x16 or 8x8
262,144 colors to 16 attributes
No video memory pages |
SCREEN 13:
Graphics
320x200 |
Text: 40 columns by 25 rows
Character size: 8x8
65,536 colors to 256 attributes No video memory pages |
Video Memory Pages
  Some of the graphics modes have multiple video memory pages. For example, SCREEN 7 has up to 8 video memory pages, 0 to 7 (depending on how much system memory is available). Each of these video memory pages has the dimensions of the screen mode, and can have different drawings and/text on them. Each page is independant from the others. The activepage is the page on which any screen output is placed. The visualpage is the page that is currently displayed on the monitor. The key is that the activepage and visualpage are not always set to be the same page.
For clarification, imagine that activepage and visualpage are simply write-only variables. Activepage might be set to 3 and visualpage might be set to 4. Changing the activepage (or visualpage) settings is not a matter of making the activepage (or visualpage) be page 1, but making page 1 be the activepage (or visualpage). Any page can be the activepage and any page can be the visualpage. Any page can also be both at the same time. This is simply a matter of terminology. If this last paragraph causes confusion, ignore it.
The active/visualpages are usually used for games and graphics. In some cases, the speeds of the statements used to display text or graphics on the screen are not fast enough to provide smooth animation. To eliminate screen flicker, the activepage should be set to something other than the visualpage. When the content is completely drawn on a page, that page can be set to become the visualpage. The transition is instantaneous and leaves very little flicker, if any at all. ' Set page 1 to active and page 0 to visual
SCREEN 7,,1,0
CIRCLE (160, 100), 50, 4
PAINT (160,100), 4, 4
' The monitor is still blank
' Set page 0 to active and page 1 to visual
SCREEN 7,,0,1
' *NOW* a red circle is on the monitor
' Any more screen output will go to page 0
Your First Program.With the blinking cursor (
PRINT "Welcome to QBASIC. Your wish is my command."
Make sure it looks exactly like that. The quotation marks (") are very important. If you make any mistakes, use the <Backspace> key to correct them.
Running Your Program.
That's great, but what does it do? You have to run it to find out. Look for the word "Run" on QBASIC's menu at the top of the screen. Click on it. Now you will see a menu with a list of selections (Start, Restart, and Continue). Click on Start to run your program. You may have to look around on the screen a bit, but you should find your message:
 C:\WINDOWS> qbasic
 Welcome to QBASIC. Your wish is my command.
PRINT
PRINT prints things to the screen. Don't forget to put what you want to say in double-quotation marks (").
Press any key to continue?
At the bottom of the screen you will see a message "Press any key to continue". Press <Enter> to get back to QBASIC. This is QBASIC's way of giving you enough time to see what your program did.
As a cool shortcut, use ? for PRINT. Try it. Press <Enter> to start typing on a new line. Now type this:
? "Programming is fun."
and press <Enter> again.
Isn't that nice? The ? becomes the word PRINT. That should save us a lot of typing in the long run.
You can try running the program again (remember? Click on Run, then Start on the menu). You should see something like this:
C:\WINDOWS> qbasic
Welcome to QBASIC. Your wish is my command.
Welcome to QBASIC. Your wish is my command.
Programming is fun.
PRINT TAB Command
We can use the PRINT TAB command if we want to print in a specified column number. This makes it easier to place the text where we want it. This allows us to construct better designs in our program. When using the Tab command.
SYNTAX
PRINT Tab (n) ; statement
n is any number 1 to 255. This specifies which column you want to print the statement.
Take this code for example.
CLS
PRINT Tab (9) ; "PERIMETERS"
PRINT
PRINT "Square" ; Tab (19) ; "4s"
PRINT
PRINT "Rectangle" ; Tab (19) ; "2l + 2w"
PRINT
PRINT "Circle" ; Tab (19) ; "2 pi r"
PRINT
PRINT "Triangle" ; Tab (19) ; "a + b +c"
Learned
- QBASIC screen
- Editing Keys
-
PRINT
-
PRINT TAB
- Run | Start
- ?
Source: http://jpsor.ucoz.com |